How would you like to create an entire month of Halloween fun for your family? This blog has seven ideas to help you do just that! All of these activities are kid-friendly, and they only require a few basic supplies. Plus, there's a FREE mega activity pack for you to download with 18 pages of games, coloring pages, and activity sheets! Pick your favorite project and start today, or save these arts and crafts ideas until October so that you can keep your kids busy all throughout the spooky season!
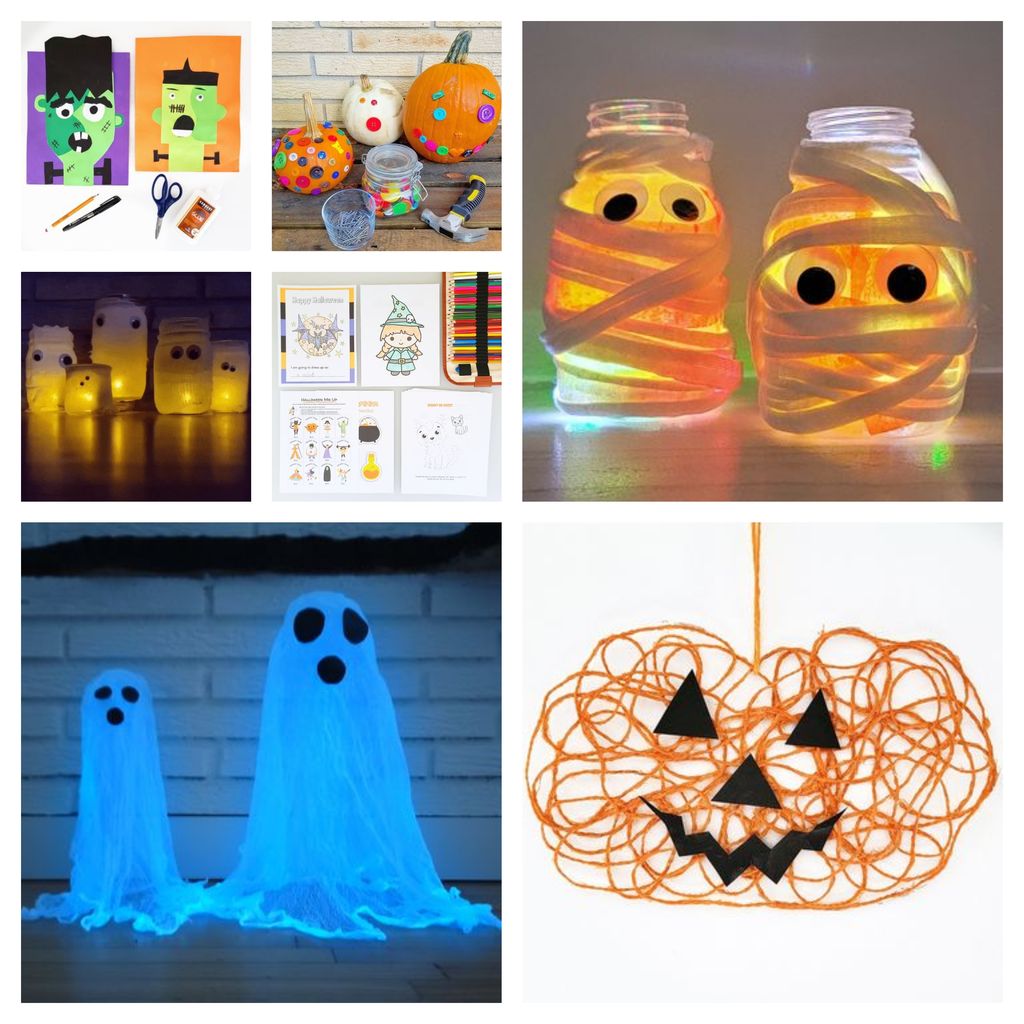
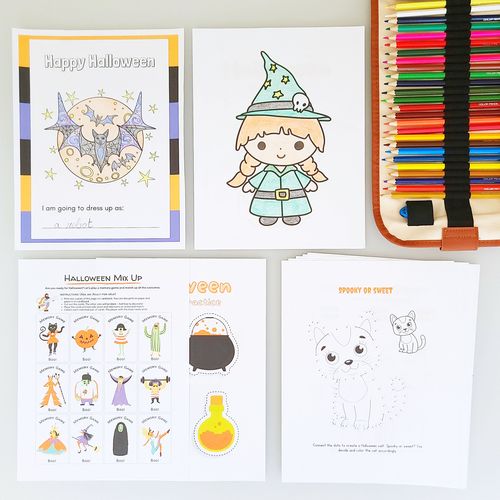
Get this free Halloween mega activity pack to keep your little ones busy in the days leading up to Halloween! Simply download the PDF and print it.
You’ll get several activities like coloring pages, dot-to-dots, scissor practice, and a maze. You can also challenge your kids to a memory game. The PDF includes cut-out Halloween characters, so you can start playing in just a few minutes. There are a few pages that kids can use to tell a friend or family member about their Halloween costume, too. It’s pages and pages of fun!
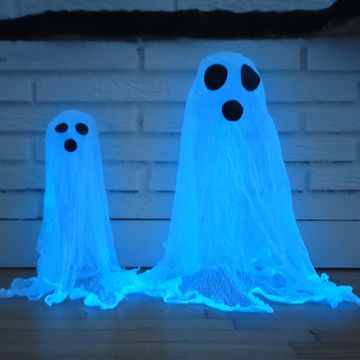
Here's a spooky decoration that defies gravity!
What You Need:
- 7.63 oz. bottle of white glue
- ¾ cup water
- Glow-in-the-dark powder
- Large mixing bowl and spoon
- 1 large piece of gauze fabric (tulle or cheesecloth also work)
- Medium Styrofoam ball or balloon
- An empty 2-liter soda bottle
- Black construction paper or felt
- Art tray or old baking sheet (it’s a messy project!)
- Scissors
What You’ll Do:
- An adult should cut off the top off the soda bottle. You want to remove the narrow neck so that you’re left with the tall portion of the bottle and a wide mouth.
- Inflate a balloon halfway and tie it off. Sit it in the soda bottle. (You can also use a Styrofoam ball for this step.) It should stick out a little bit, like a head on a body. This will be the form for your ghost.
- Lay the piece of gauze over the balloon and soda bottle. This gives you an idea of what your ghost will look like. Be sure that some of the fabric pools at the bottom. That’s what will hold the ghost up once it’s finished. Trim the fabric as needed.
- In your mixing bowl, stir together the entire bottle of glue and the water. Add the glow-in-the-dark powder according to the package instructions.
- Place the soda bottle/balloon on an art tray or old baking sheet. Dip the gauze fabric into the glue/water mixture. Use your hands to make sure the fabric is covered with the mixture.
- Remove the fabric from the bowl and drape it over the soda bottle/balloon.
- Allow the ghost to dry 12-24 hours.
- Cut eyes and a mouth from the black construction paper or felt, then glue them on your ghosts.
- Display your decoration!
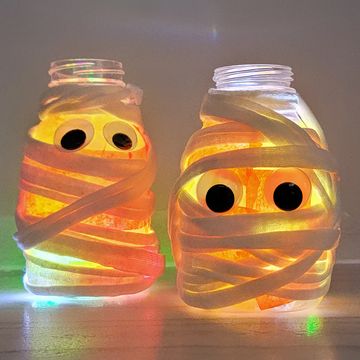
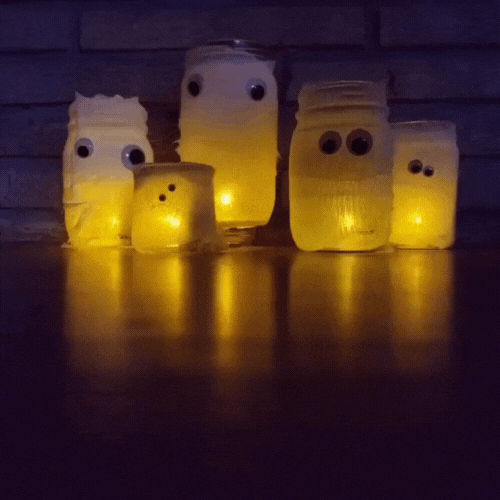
You can upcycle an old glass jar to make this glowing mummy!
What You Need:
- A clear glass jar (for example, a clean food jar or a mason jar)
- Tissue paper in Halloween colors like yellow, orange, and black
- White yarn or ribbon (t-shirt yarn works well)
- Scissors
- White glue
- Paintbrush
- Googly eyes
- Flameless candle(s)
What You’ll Do:
- Use a paintbrush to cover the jar with glue. The best way to do this is to turn the bottle on its side, squeeze some glue onto it, and spread out the glue using the paintbrush. As you go, you may find it helpful to hold the bottle by its neck. Add glue to all four sides but not to the bottom or to the upper neck of the bottle.
- Tear strips of tissue paper and press them into the glue if needed.
- To make sure the tissue paper lays flat against the glass, use the paintbrush to paint over it with a bit of glue.
- An adult should tie the white string around the neck of the bottle. Then, the child can wrap the string around the jar like a mummy! When you get to the end of the string, tuck it under the wrapping.
- Add the googly eyes to the bottle.
- Add a flameless candle to the jar and you have a mummy lantern!
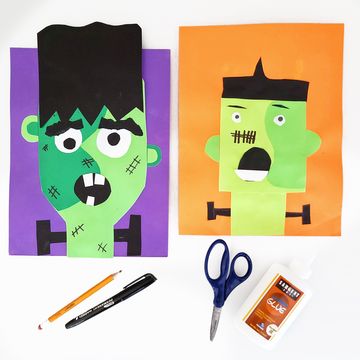
This paper craft is more silly than spooky. Kids will love to add a bit of personality to Frankenstein!
What You Need:
- Dark green, light green, orange or purple, black, and white paper
- Glue
- Scissors
- Pencil
- Black marker
- Art tray or old baking sheet (this is optional, but it helps contain the mess)
What You’ll Do:
Note: Several of the steps involve cutting shapes. If your young artist isn’t confident in cutting without an outline, draw the shapes first and then encourage them to cut.
- From the light green paper, cut one large square to be the face and one smaller square to be the neck.
- From the darker green paper, cut a rectangle that’s the same height as the face, but only about half the width. Then, cut waves or shapes into the edge of the rectangle. Glue it on top of the first square so that Frankenstein’s face looks different on the right and the left sides. Trim your square.
- Choose a purple or orange paper to be the background. Glue the neck square on the bottom edge. Glue the face square above it.
- Cut two semicircles out of the green paper. Glue them on the sides of the face as ears.
- Cut out two white circles. Glue them on the face as eyeballs. Cut two smaller circles from black paper and glue them on as pupils.
- Use the black paper to make hair. You can cut one wavy strip or several spiky pieces. Glue it to the top of the face.
- Tear two small strips from the black paper. Glue these on the face as eyebrows.
- Cut a piece of black paper to form a mouth. Glue it on the face. Also cut teeth from white paper and glue them on the mouth.
- Cut two t-shaped bolts from the black paper. Glue one on each side of the neck.
- Use a black marker to add scars and stitches to the face.
- Display your artwork!
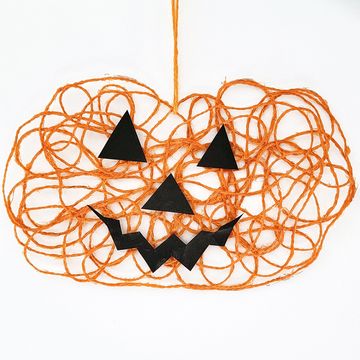
What You Need:
- A small ball of orange yarn (reserve a long piece of yarn for hanging your pumpkin once it’s dry)
- Parchment paper
- A marker or pencil
- Black construction paper
- Scissors
What You’ll Do:
- Add approximately ¼ cup water and ¼ cup glue to a small mixing bowl and stir.
- Draw the outline of a pumpkin on parchment paper.
- Place the orange yarn into the glue mixture. Make sure it is coated with the mixture. Lay it inside of your pumpkin drawing. Don’t lay it straight—spread it out in big swirls! Fill out the entire shape that you drew. Gently press on the yarn as you place it around the shape.
- Draw jack-o-lantern shapes on the black construction paper to make the face of your pumpkin. Cut out the shapes. Press them onto the wet yarn.
- Allow the piece to dry for 12-24 hours.
- When it’s dry, the yarn will peel right off the parchment paper.
- Loop the reserved piece of yarn through the pumpkin and hang it up!

This is the perfect project for kids who aren’t old enough to carve pumpkins yet!
What You’ll Need:
- Nails
- Buttons (Use whatever you have lying around the house or pick up craft buttons at a craft store.)
- Child-sized hammer or mallet (adult supervision required at all times!)
- Pumpkins
What You’ll Do:
This project is completely child-led. They simply attach buttons to the pumpkins using a nail and hammer. They might want to make a face or cover the entire pumpkin with buttons!
This Halloween project is easy enough for young toddlers to make!
What You’ll Need:
- A roll of first-aid gauze
- A glass jar
- Googly eyes
- Tape
- Glue
- Flameless candle
What You’ll Do:
- Wrap the jar with gauze. When you reach the end of the roll, tape it in place.
- Glue googly eyes to the gauze.
- Place a flameless candle inside the jar and watch the mummy glow!